#mongoose connection in node js
Explore tagged Tumblr posts
Visit Tumblr Blog
Explore Tumblr blogs with no restrictions, modern design and the best experience.
Last Seen Tumblr Blogs


Fun Fact
Hackers stole 65M passwords from Tumblr in 2013.
Text
Mongoose npm for nodejs 2023
Mongoose is a widely-used Node.js library that provides a straightforward and elegant way to interact with MongoDB, a popular open-source NoSQL database. Developed to simplify database management and streamline interactions between applications and MongoDB, Mongoose offers an object modeling system that enables developers to define schemas, validate data, and perform CRUD (Create, Read, Update, Delete) operations with ease. Read More..
1 note
·
View note
Text
Node JS and Databases
Steps to Build a Blog Application
1. Project Setup
First, you create a new Node.js project on your computer.
You also install necessary tools like Express (for creating a web server) and Mongoose or MySQL (for interacting with the database).
Nodemon can be used during development to restart the server automatically when code changes.
2. Folder Structure
Organize your project files so that everything is easy to manage.
Models: This folder will store database schemas (like the blog post structure).
Routes: These handle requests to different parts of your blog (e.g., showing all posts or creating new ones).
Views: These are the templates used to render your pages (like home, post details).
Public: A place for static files (CSS stylesheets, images).
3. Setting Up the Database
You can use either MongoDB (a NoSQL database) or MySQL (a relational database) to store your blog posts.
MongoDB is easier for beginners because you don't need to define strict tables.
You create a "Blog" model, which defines the structure of each blog post (e.g., it should have a title, content, and a timestamp).
The database connection is established at the beginning so the app can interact with it throughout.
4. Handling HTTP Requests with Express
The Express framework helps manage the flow of the app:
When a user visits the home page, the server sends a list of all blog posts.
When they click on a specific post, it shows the details of that post.
There is also a form where users can create new posts by submitting titles and content.
You create routes to manage these requests. Each route corresponds to a specific URL (e.g., / for the home page, /post/:id to view a post).
5. Creating Views (Templates)
To make your pages dynamic, you use EJS (or another templating engine like Handlebars). Templates allow you to display different content based on the data from the database.
For example:
The home page lists all available blog posts with links to view them individually.
The post page shows the title, content, and date of a single post.
There can also be a form on the home page that lets users submit new posts.
6. Routing and User Interaction
When users visit the homepage, the server pulls data from the database and shows a list of posts.
Clicking on a post’s link takes them to a detailed view of that post.
Users can also add a new post by submitting a form. When they do, the app saves the new post in the database and refreshes the list.
7. Starting the App
You need to make sure both the database server and Node.js app are running.
MongoDB needs to be started separately (if using it).
The Node.js server listens for requests and responds based on the routes you’ve created.
The server is accessible via http://localhost:3000. You can open this in a browser to test the blog app.
8. Testing the Blog API (Optional)
To make sure everything works correctly, you can use tools like Postman to test your routes:
Test retrieving all posts by making a GET request.
Test creating a new post by sending a POST request with sample data.
You can also build error handling to manage invalid inputs.
9. Future Improvements
After setting up the basic blog, you can add advanced features:
User Authentication: Allow users to log in and manage their own posts.
Comments: Add a comment section for each post.
Pagination: Break long lists of posts into pages for better readability.
CSS Styling: Make the blog look more attractive with a custom stylesheet.
Summary
This blog app involves setting up a Node.js server, connecting it to a database to store posts, and using templates to render pages. When users visit the blog, they can view, create, or manage posts, all of which are stored in the database. Express routes manage the requests, and the views ensure everything is displayed neatly.
This project gives you hands-on experience with backend development using Node.js, along with frontend templates, and a solid understanding of working with databases.
Fullstack Seekho is launching a new full stack training in Pune 100% job Guarantee Course. Below are the list of Full Stack Developer Course in Pune:
1. Full Stack Web Development Course in Pune and MERN Stack Course in Pune
2. Full Stack Python Developer Course in Pune
3. full stack Java course in Pune And Java full stack developer course with placement
4. Full Stack Developer Course with Placement Guarantee
Visit the website and fill the form and our counsellors will connect you!
0 notes
Text
Part2 | Create Book Store Microservices with MongoDB using Nodejs Express & Mongoose Modules
Full Video Link https://youtu.be/DhtvZy7k-bg Hello friends, new #video on #code implementation #coding #tutorial of #nodejs #microservices with #mongodb for #api #developer #programmers with #examples is published on #codeonedigest #youtube channel
This is part2 tutorial of Nodejs Microservice with Mongodb. In this video we will learn how to create book store microservices with mongodb in NodeJS using Express & mongoose packages. I will explain important packages in Nodejs. I will also show you step-by-step code to create microservices in Nodejs. You will be able to create microservices with mongodb in 10 mins. So, stay tuned & watch this…
View On WordPress
#mongodb#node js express#node js express api project#node js express api tutorial#node js express application#node js express course#node js express crash course#node js express project#node js express rest api#node js express tutorial#node js mongodb#node js mongodb tutorial#node js mongoose#node js mongoose connection#node js mongoose express#node js mongoose schema#nodejs express api#nodejs microservice#nodejs microservice architecture#nodejs microservice example#nodejs microservice framework#nodejs microservice project#nodejs microservices interview questions#nodejs microservices tutorial#nodejs mongodb
0 notes
Text
How to Choose the Right Technology for Your Project: Python vs Nodejs?

The high-level difference between Node.js and Python is that the former is mainly used for back-end services, while the latter is often used for front-end development.
In this blog post, we’ll explore common use cases for each language and help you select the right technology for your project.
1. Compatibility
NodeJS is compatible with all the major operating systems and browsers.
Python, on the other hand, is compatible with all major operating systems, but not all browsers.
NodeJS is compatible with all major browsers while Python can only be used in Internet Explorer 8+ & Chrome 17+.
2. Performance
NodeJS vs Python Performance – This is another important factor to consider when choosing the right technology for your project.
NodeJS: NodeJS is dynamically typed, Node.js is essentially a server-side JavaScript framework, which means that it is ideal for writing web applications and APIs. Node.js has been built from the ground up to be asynchronous, event-driven, and non-blocking.
This means that when writing code in Node.js, you have to think about how your application will behave when multiple users are using it at the same time (and more importantly synchronizing their requests). event-driven and single-threaded. So, it’s faster than Python for web development using frameworks like ExpressJS, etc.
NodeJS uses JavaScript on the server side which makes it easy to learn for frontend developers who are new to server-side programming.
Python: Python is slower than NodeJS but it’s a very stable and mature language with great community support. If you want to build a big data application or real-time web application then Python is one of the best options available today because it’s very fast and scalable compared to other programming languages like Ruby, Java, C#, etc.
3. Frameworks
You will find that Python is a library, whereas NodeJS is a framework. The difference between these two terms should be clear by now:
Python is an interpreted language and runs on any platform, whereas NodeJS is a runtime environment that runs JavaScript code in the browser or on servers.
NodeJS has some built-in modules for HTTP requests, but you can always install more modules from npm (Node Package Manager) if needed.
4. Scripting and Web Development
While Python may not be as good at this due to its current limitations in terms of performance on multiple CPUs/cores; however, Python can still handle many concurrent connections without much effort on your part if you use Celery or RabbitMQ.
5. Learning Curve
The learning curve is an important factor to consider when deciding which framework to use. Both Node and Python are general-purpose programming languages, so you can use them for a variety of different applications.
When it comes to Node vs Python Backend, Node is a server-side framework that runs JavaScript on the back end, whereas Python is simply a language that can be used for both frontend and backend development.
Why is NodeJS better than Python? Since NodeJS uses JavaScript as its core programming language (the same as HTML), it is easier to learn than Python.
If you are comparing NodeJS vs Python for web development, then NodeJS will likely be more appealing because there aren’t many things that come with it out of the box like some other frameworks do (like Django).
6. Memory Management, Concurrency, and Database Access.
Memory management: NodeJS uses a V8 JS engine that is faster than Python’s CPython. NodeJS also has better memory management than Python.
Concurrency: NodeJS is designed to support a large number of concurrent connections, making it useful in real-time applications such as chat servers and multiplayer games.
Because of its asynchronous nature, you are not required to use threads or callbacks which makes it easy to code and test your code.
Database access: If you need any database access in your project, then NodeJS is the right choice for this purpose because it comes with an inbuilt database library called “Mongoose” that allows you to interact with MongoDB databases easily without writing much code at all!
7. Supported Platforms and Libraries
Another important factor is the supported platforms and libraries. NodeJS is supported on a wide range of platforms, including Windows, macOS, Linux, and Unix.
Python has similar support but also includes Android and iOS (this is not surprising since Python was initially developed to run on mobile devices).
NodeJS has a much larger community than Python which means there is more opportunity to find help with issues you may encounter.
8. Datasets and Libraries Support Python and Nodejs
Python has a much larger community and ecosystem. This means that there are numerous libraries for various use cases, as well as automation tools for DevOps. Python is also the language of choice for data analysis and machine learning
NodeJs is better at server-side programming, while Python can be used both on the front end and back end
Summing Up…
At the end of the day, both NodeJs and Python are great languages with a lot of advantages. It all comes down to what kind of project you’re working on and whether one is better suited than another for your needs.
The NodeJs vs Python debate has been raging for years, with no sign of slowing down anytime soon. If you’re looking to start a new project or need some help choosing between the two languages, this article will give you some pointers on how they stack up against each other in terms of performance and popularity. And if you need any assistance with building the applications then contact the Digital Info Bytes team to discuss your requirements in detail.
This article is initially published on Digital Info Bytes!
#Node vs Python Backend#Nodejs or Python#Nodejs vs Python#Nodejs vs Python for Web Development#Nodejs vs Python Performance#Why Node JS Is Better Than Python
0 notes
Text
Send data from the backend (Node JS) to a database (MongoDB)

How to send data from back-end to database?
To send data received by the back-end to a database and store it there we'll use mongoose.
mongoose is a Node JS library for MongoDB database.
In this tutorial we'll use MongoDB as database.
To know how we send data from the front-end to the back-end check my tutorial: https://purpose-code.com/fetch-api-send-data-from-front-end-to-back-end/
1)- What is MongoDB?
MongoDB is a document-oriented NoSQL database used for high volume data storage. The difference between MongoDB and the traditional database like SQL is that MongoDB stores data in collections, while the traditional database store data in tables (rows and columns).

Traditional storage

MongoDB storage
2)- How to send data from Node JS to MongoDB?
Let's work with the data we had from the previous tutorial that you can check here: https://purpose-code.com/fetch-api-send-data-from-front-end-to-back-end/
Le'ts store this data in mongoDB.
First let's install a library in Node JS called mongoose. mongoose will help us set a template of the data to tell MongoDB this is how we want our data to be stored.
To install mongoose just go to Node JS terminal and type npm install mongoose.

Now that mongoose is installed, let's create a new .js file.
1)-Step 1: Create a new .js file
Let's create a new .js file and give it a name of template.js.
Inside this file we'll import our mongoose library or module. To do that we'll use the require() syntax.
So the code will be:

After requiring mongoose module, we'll access mongoose Schema property. The mongoose Schema property is a constructor. This constructor is what will allow us to set a template for our data.
To access mongoose Schema we'll add the following code:
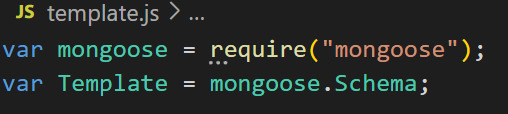
The Template variable name starts with uppercase T because as we said, Schema is a constructor, and constructor's names always start with uppercase.
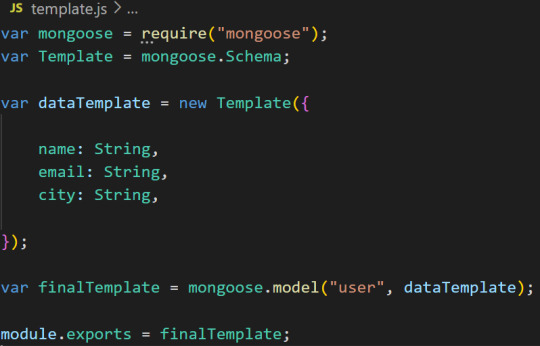
Now it is time to create the template. To do that we'll call the Template constructor that will help us create a new instance.

So inside this dataTemplate variable we'll add the template of our data to tell mongoose we want MongoDB to receive for example the name, the age and the city of each user, or we want MongoDB to receive the name, the email and the address of each user and so on... Depending on what we want to store.
So here we want to store the name, the email and the city of the users. So the template will be:

So here we told mongoose that we want to store the name, the email and the city. And also we specified the type of these variables. All the variables are String.
If we wanted to store the phone number as well, and add some condition on the email to make it compulsory for the user to provide it, and the name to be less than 10 characters long, we would have set the template like this:

But now let's keep it simple and store only the name, city and the email of the users.
Now we will tell mongoose we're finished, all you have to do is to create the model from the template we just created, and store it in a certain database:

mongoose.model() syntax is what tells mongoose to create a model. It takes 2 arguments: The name of the database and the template we created. Which means mongoose should create a model and store it in a database named "user", and the model should be created from the dataTemplate variable.
Just for information, when storing data in MongoDB, if MongoDB does not find the database that has a name of "user" then it will create one automatically.
Also, here we gave the database a name of "user", but when storing data MongoDB will add an "s" at the end of the "user", which will make it "users". This is how MongoDB works.
So now that we told mongoose to create a model, it is time to export the variable finalTemplate so that we can work with it and use it outside the template.js module.
2)- Step 2: Connect to the database
Now let's connect to the database.
First, go to MongoDB and create a free account here: https://www.mongodb.com/cloud/atlas/register
Once the account created the following page will appear:
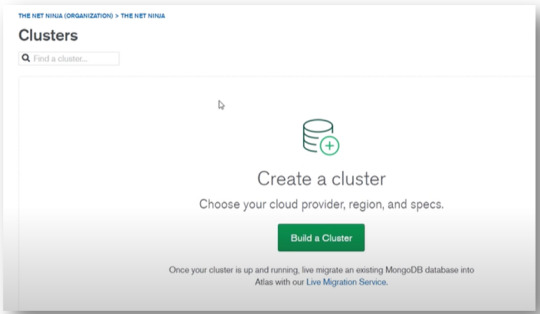
You should create a "cluster" by clicking on the button "Build a cluster".
Once clicked on the button you'll have to choose one of the 3 plans. In this tutorial we'll go with the "Free" plan.

Now after choosing the Free plan you'll have the following page:

Down in the above picture there is "Cluster name" section, click there and give the cluster a name of "nodetuts". You can give it any name you want but in this tutorial we will work with "nodetuts".
Now after creating the cluster you'll have the following page:
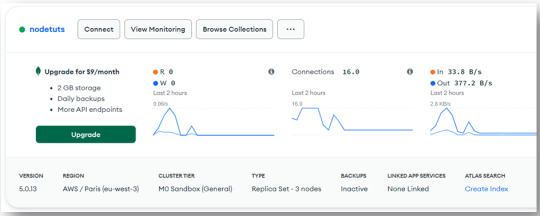
To read the full tutorial check my blog below:
https://purpose-code.com/send-data-from-backend-node-js-to-mongodb/
#html#html5 css3#htmlcoding#learn html#html website#html5games#nodejs#node js developers#node js development services#node js web development#mongodb#data storage#css#css3#learn css
0 notes
Text
Brief for project - Context outline
We began with an in person Hackspace hackathon with the intention of facilitating quick idea generation and project ideation. The first of two hackathons setup during the Hackspace module, this one with the intention of collaborative ideation. The brief was open and would allow us to explore multiple ideas in groups and ideate on these collaborative thoughts. This blog is an in-depth documentation of the process and the realisation of the project and all its components.
The brief being so open meant that within our groups we would need to quickly run through a number of project ideas, looking at feasibility and our skillset. We ended up deciding that the context of the project was surrounding the generation of character connections for use in games and maybe with a future development for general storytelling. The project would aid in the creation of character wireframe, a web of connection with a number of assets, this ultimately being helpful adding depth to a game of Dungeons and Dragons for example.
Hackathon - Techniques
Though I have already mentioned the idea and the context it's embedded in, the idea only came to fruition through the hackathon. Only through the use of these techniques mentioned were we able to nail down the project and how it would address certain issues.
We started the Hackathon with a page dump, trying to note down as many areas or concepts as possible then we began to refine the assortment of concepts and help narrow down areas for focus. This technique was helpful in applying some restraints to the creative process, creating a small amount of pressure for the development of ideas. Through this method we were able to as a group nail down specific areas for theme development. These were Connections, Dreams, Parallel. We looked at a combination of all three when attempting to ideate through possible applications.
Failed Ideas / progress
We found an initial idea that centred around an alarm application that would be able to track your sleep and then deliver a personalised wake-up routine to ease the transition from sleeping to awake.
Using these themes we were able to come up with this idea quickly, we spoke and attempted to develop it further having to complete a small presentation for the class in order to receive feedback and critique. We continued to look at possible technologies in order to achieve the application. We quickly found that the technical ability in the timeframe we had would not be feasible in combination with the feedback we had received from the group.
The Idea
After moving away from our initial idea we continued to think on an application with user benefits that would fit the technological and time constraints of this collaborative project. Joel pitched an idea for a character generator with the application to aid users in the quick creation of character connections for use in games such as Dungeons and Dragons where characters are heavily focused. We also spoke about future applications being for writers, generally aiding in creating webs of characters with relationship indicators.
In terms of reaching the foundations of this idea we looked at a number of methods outlined in the teaching during the Hackathon. Reverse brainstorming helps facilitate this idea heavily. Being able to identify a problem that many of us have faced, look at a possible solution and develop a real solution to said area. We found that attempting to come up with a large collection of characters quickly with a few attributes was difficult, only being able to figure out the central character. We found that using a bank of many attributes, names and relationship levels we could quickly create a character web for story based situations.
We were also able to apply a number of techniques from the Scamper Method, Adapting a similar concept of generators. Example: Name generators, idea generators. There seemed to be an endless amount of generator websites for all different areas. Using the Adapt concept we had changed the context of existing models, applying it to a more niche market and adjusting the tone for a more creative story orientated product. It could also be loosely applied to the Rearrange concept, having reordered the users journey giving them a platform to build from rather than shaping their characters whilst involved in a specific game or story situation. It hadn’t completely removed this aspect as the generator served as a baseline for users to work from and adapt, adopting as little of the generated information as they desired.
What followed and the development of the idea
Paper prototyping


Initial meeting
We spoke about what kind of technologies we wanted to use when creating the product
We decided initially on an entirely web based stack, using html for the frontend with an RESTful API for the sending and receiving of data. It would also allow use to connect the entire application to a database for persistent storage
Began to paper prototype some interface designs, Nishesh was set the role of UI designer and began working on some high fidelity mockups to add in the frontend development that would be undertaken by Joel.
First Tasks
I had researched a number of technologies from our initial conversations regarding what stack to use, we had come to the conclusion that each of us brought certain skills and we should utilise them. In keeping with this, I had come to the conclusion that Node js, Express, Mongoose and Mongodb would be our key backend technologies.
I began researching possible implementations for Mongodb (The database) and the Node js server using express as a framework. I had only used Mongodb once before and after researching I found Mongoose a package that allowed me to customise schemas for sending and receiving data from the database
I then began creating the API, creating specific routes for specific data, this would create documents in the database that could be queried and updated.
Technical Design
Backend
GitHub Repo: https://github.com/blanghamm/hackspace-collab-api
MongoDB

Document stucture for MongoDB, collections on the left hand side.
The backend structure was very important in dictating the frontend usage and also how we stored all the user information as well as the template names and attributes. We needed something that was flexible, this was the main factor in choosing MongoDB as the database. MongoDB is a NoSQL database, it relies on collections that contain documents rather than tables (SQL). Its lack of structure in comparison to SQL is what makes it very helpful for robust flexible data management.
Mongoose
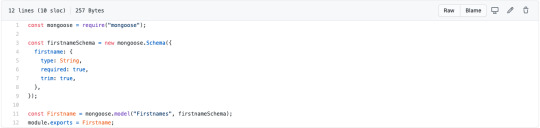
Schema for the structure of data inside of the database when moving through the server.
Mongoose was used as middleware when creating the server that connected to the database, it facilitated the creation of schemas. Schemas allow for a number of rules to be set up restricting the information parameters be it for incoming or outgoing data. For example the schema model for sending data is structured as below (Image) it shows the type of data it expects. This allows for the data we send and receive to be consistent throughout the API. This would help with interpreting the information later in the frontend application.
Express
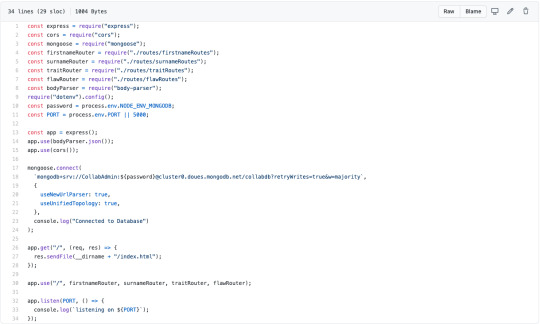
Main server file that contains all the routes for the API.
Express is a framework for Node js , it helps in easing the process when creating a server. Having a myriad of HTTP utility methods and middleware built in. It states on their website that ‘creating a robust API is quick and easy’. https://expressjs.com/ Having used it previous I found this statement to be pretty accurate. I was able to quickly create a server with a single entry point and then begin to attach various routes.
Hosting

List of builds on Heroku allowing for access to the API with a URL.
It’s not very exciting but here’s the link for the API with the endpoint firsnames, which will return a JSON dataset with firstnames stored in the database. They are structured by the Mongoose schema pattern linked above.
https://hackspace-api.herokuapp.com/firstnames
Once I had created the different endpoints depending on the data needed for the frontend I made it more accessible by hosting it on Heroku. A hosting platform specially designed for web applications. This meant it was accessible from anywhere with the correct URL. This meant when Joel began testing the frontend application he was able to access the data without having to download all of the necessary files.
Frontend
GitHub Repo: https://github.com/JoelRobinsonUK/ConnectionGenerator
Prototype
youtube
Here’s a link to the working protoype: https://joel-robinson.itch.io/character-relationship-generator
We initially decided on an entirely web based application, many of the team wanted to try out some new technologies. Once we had begun researching all of the necessary technologies we found that creating the frontend in purely HTML and JS would be quite difficult without a framework for live data manipulation. We therefore decided to use Unity for the frontend application as this was more familiar to the team.
The combination of a Unity frontend and Node js backend proved to be a strong combination but there were a number of issues along the way. One main issue we had when attempting to retrieve the data from the API was how Unity interrupted JSON data which is what the server stored all its information in. Initially using the Unity plugin JSON Utility to decode the data we found that it was not able to process objects wrapped inside of a top level array. We therefore found another plugin that allowed use to decode the JSON data inside of Unity. JSON.net was that plugin that helped us with data transfer.
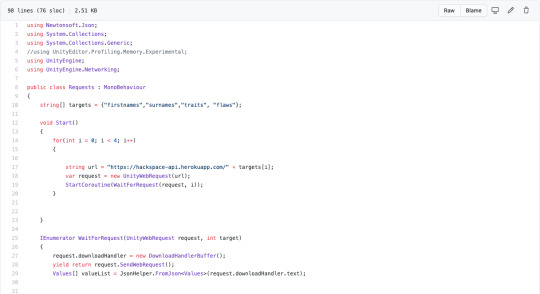
The code needed for a web request, pointing at the heroku hosted URL.
We used a web request to retrieve all of the data from the API and also send data back when needed, it allowed us to manage the data separately and only request it when needed. This helped with removing a large dataset inside of Unity and meant updating information would be much easier due to its external nature.
Maximum degrees of separation
Degrees of separation decide the amount of single point connections that stem from the main character. Adding more degrees will create offshoots further away from the central character.
Not all smooth sailing
When speaking to Joel about any technical setbacks, he found that attempting to sort the degrees of separate had some odd outputs from the node rings that are pre-placed. When the user begins interacting it limits the amount of nodes that are shown depending on the degrees of separation, but this would cause some interesting connection lines between the nodes that wouldn’t strictly follow the users rules.
Visual Design
youtube
When planning the visual side of the application we found a quick way to move forward with the prototyping phase was to paper prototype a user interface. (Image) We wanted to have a central area with the connections clearly highlighted followed by a number of settings and modifiers surrounding it to allow for a constant reconfiguration. It would give the user the ability to regenerate a set of character relationships on the main dashboard without having to start the process from scratch.


These two examples above are from the original high fidelity designs Nishesh created from the paper prototypes. The video above is the second iteration and closer to the desired design.
When moving forward with the UI designs, Nishesh began developing the initial version of high fidelity designs. He initially used Sketch to create the designs sharing them through Zeplin, which also included the css properties though they were no longer needed due to the change in frontend framework. The second refined designs were created using Adobe XD as they had some collaborative features that would be useful for future developments. I’ve included some screenshots of the UI itself (List Order) Also attached is a video with a run through of how to use the interface.
Here’s a link to all of the visuals used throughout the projects development:
https://drive.google.com/drive/folders/1fa5MCDmFke7bUY2hwkxnC577YSi0c410?usp=sharing
User Testing
“Overall I really like the product. It’s a good way to develop a story as what often delays the plotting process is coming up with the characters and deciding what their relationships to each other are. This tool offers prompts to help with that process.
Suggestions: An option of seeing “biggest fear” or “dreams” to have a better understanding of the characters.
The option to change the type of relationship between two characters, and add/remove connections.”
We found through some quick user testing that the application fit the area we had intended to deploy it to, helping with the process of character relationships. With the feedback we received we were able to add a number of possibilities to the future development document, adding more customisation for users would be the next logical step. Made possible by the flexibility of our system architecture.
Critical Reflection
Development
The overall concept for the project fit nicely with the prototypes we created and used a number of key technologies that utilised skill sets within the team. It focused on a problem and adapted current applications such as name generators to create a unique character relationship generator for story based games. Also being able to test it on a number of participants helps us to diagnose areas that require more focus.
The requirements for the project were met, we were able to create a number of visual prototypes that could showcase the UI and design aspects of the project. Moving from the paper prototypes and adapting them to fit the needs of the application. Using technology such as Node js allowed for the creation of a flexible and scalable platform that would facilitate future development of the project. This coupled with a Unity frontend that could be attached to the backend system helped with quick prototyping of a reactive product.
Being that we had used these two separate technologies also meant that for future development the project itself had become rather modular and therefore if we found weakness in certain technologies we could reconfigure the stack depending on the specific boundaries.
Roles & Collaboration
Being that the initial concept took a few sessions to iron out, it allowed us to fully understand each other's strengths and assign each role to the correct team member. I think this is apparent in the progress the project made and the wide range of technologies that contribute to the final prototype. Throughout the project we kept to our initial concept and made sure not to scope creep too heavily, any additional ideas were added to a future development document which Wiktor had been updating and assessing how that would benefit our project in the future. This had been vital in keeping on track with the concept and delivering a prototype as close to our original idea as possible.
Possible areas for improvement were only due to the lack of knowledge in specific areas, it was marginally disappointing that when jumping between technologies we all lacked a slight understanding of each other's role and tech. There were of course areas that we could help one another but it would have been better as a team to be able to jump between all roles and offer as much assistance as possible. As much as this was a disappointment in terms of having more input to specific aspects, I feel the team was very effective in their area delivering some high quality prototypes, that in tandem with consistent communication throughout.
Personal contribution
There were moments during the project that certain aspects felt a little aimless in our goals but I feel that as a team we were able to address this issue with each of us pushing the others on certain aspects and putting us back on track. Throughout the project I felt as though I personally had to do this, scheduling meetings to share progress and make sure everyone was comfortable with their personal objectives.
I enjoyed working on my specific technology and believe that it contributed heavily to the project and made sure it was scalable and easy to use for other team members. Throughout the project I felt that the leadership was mainly managed by Joel and he helped align the scope throughout but there were times when I would need to check in and monitor that everyone was happy and on course which worked well not putting too much pressure on one team member.
Future Developments
When looking at future developments for the project a number of ideas that we had taken during the development process had been added, as not to scope creep. Being able to save the character web for future reference and allow for the editing and saving of an updated character web. This would be easy to implement with the flexibility of the backend API, the overall structure of the database would allow users to save full webs and recall when needed.
References
parentElement LLC (2017) JSON .NET For Unity (2.0.1). Available at: https://assetstore.unity.com/packages/tools/input-management/json-net-for-unity-11347 (Accessed: 20 October 2020).
Heroku., 2020a. Platform as a Service | Heroku [online]. Available from: https://www.heroku.com/platform [Accessed 6 Nov 2020].
Mongoose., 2020b. Mongoose ODM v5.10.12 [online]. Available from: https://mongoosejs.com/ [Accessed 6 Nov 2020].
MongoDB., 2020c. The most popular database for modern apps [online]. MongoDB. Available from: https://www.mongodb.com [Accessed 6 Nov 2020].
Express., 2020. Express - Node.js web application framework [online]. Available from: https://expressjs.com/ [Accessed 6 Nov 2020].
0 notes
Link
#nodejs
#expressjs
#webtechnology
#webdeveloper
#javascript
0 notes
Text
Node.js, Express, MongoDB & More: The Complete Bootcamp 2019

Description
Do you want to build fast and powerful back-end applications with JavaScript? Would you like to become a more complete and in-demand developer? Then Node.js is the hot technology for you to learn right now, and you came to the right place to do it! Welcome to the Complete Node.js, Express and MongoDB Bootcamp, your fast track to modern back-end development. This course is the perfect all-in-one package that will take you from a complete beginner to an advanced, highly-skilled Node.js developer. Like all my other courses, this one is completely project based! And not just any project: it's a complete, beautiful and feature-rich application, containing both a RESTful API and a server-side rendered website. It's the most fantastic and complete project that you will find in any Node.js course on the internet! By building this huge project, you will learn all the skills that you need in order to plan, build and deploy your own modern back-end applications with Node.js and related technologies. (Actually, if you feel like exploring the project, you can do so at www.natours.dev. And this is only a small part of the project! Log in with "[email protected]" and password "test1234") After finishing this course, you will: 1) Be building you own fast, scalable and powerful Node.js RESTful APIs or web applications; 2) Truly understand how Node.js works behind the scenes; 3) Be able to work with NoSQL data and model data in real-world situations (a hugely important skill); 4) Know how modern back-end development works, and how all the different technologies fit together (hard to understand from scattered tutorials and videos); 5) Have experience in professionally-used tools and libraries like Express, Mongoose, Stripe, Sendgrid, Atlas, Compass, Git, Heroku, and many more; 6) Have built a complete application, which is a perfect starting point for your own applications in the future. Please note that this course is NOT for absolute web development beginners, so you should already be familiar with basic JavaScript. NO back-end experience required though! It's an absolutely full-packed, deep-dive course with over 40 hours of content! Since this is the "Complete Node.js Bootcamp", the course is crammed with tons of different technologies, techniques, and tools, so that you walk away from the course as a complete Node.js developer. That's why the course turned out to be over 40 hours long. But if that sound like too much for you, don't worry, there are videos or entire sections that you can safely skip. Here is exactly what you're gonna learn: Fundamentals of Node.js, core modules and NPM (Node Package Manager) How Node.js works behind the scenes: event loop, blocking vs non-blocking code, event-driven architecture, streams, modules, etc. Fundamentals of Express (Node.js framework): routing, middleware, sending responses, etc. RESTful API design and development with advanced features: filtering, sorting, aliasing, pagination Server-side website rendering (HTML) with Pug templates CRUD operations with MongoDB database locally and on the Atlas platform (in the cloud) Advanced MongoDB: geospatial queries, aggregation pipeline, and operators Fundamentals of Mongoose (MongoDB JS driver): Data models, CRUD operations, data validation, and middleware Advanced Mongoose features: modeling geospatial data, populates, virtual populates, indexes, etc. Using the MVC (Model-View-Controller) architecture How to work with data in NoSQL databases Advanced data modelling: relationships between data, embedding, referencing, and more Complete modern authentication with JWT: user sign up, log in, password reset, secure cookies, etc. Authorization (user roles) Security: best practices, encryption, sanitization, rate limiting, etc. Accepting credit card payments with Stripe: Complete integration on the back-end and front-end Uploading files and image processing Sending emails with Mailtrap and Sendgrid Advanced error handling workflows Deploying Node.js application to production with Heroku Git and GitHub crash course And so much more! Why should you learn Node.js and take this course? If you want to learn Node.js and modern back-end development, then there is no doubt that this course is for you! It's the biggest Node.js course on the internet, it has by far the most complete course project, and offers the most in-depth explanations of all topics included. And even if you already know some Node.js, you should still take this course, because it contains subjects that are not covered anywhere else, or not in the same depth! But maybe you're not yet convinced that Node.js really is the right technology for you to learn right now? Well, first, Node.js will allow you to use your JavaScript skills to build applications on the back-end. That itself is a huge gain, which makes your full-stack development process so much easier and faster. Plus, popularity and opportunities for Node.js are off the charts. It's a modern, proven and reliable technology, used by tech giants (and 6-figure-salary-paying-companies) like Netflix, PayPal, Uber, and many more. Node.js really is what you should invest your time in, instead of outdated technology like PHP. In summary, if you already know JavaScript, learning Node is the logical next step for you! It will make you a better, more versatile and complete developer, which will ultimately boost your opportunities in the job market! And I created this course to help you do exactly that! It really is the course I wish I had when I was first learning back-end development with Node.js and all related technologies. And this is what you get by signing up today: Lifetime access to 40+ hours of HD quality videos. No monthly subscription. Learn at your own pace, whenever you want; All videos are downloadable. Learn wherever you want, even without an internet connection! Friendly and fast support in the course Q&A whenever you have questions or get stuck; English closed captions (not the auto-generated ones provided by Udemy); Course slides in PDF format; Downloadable assets, starter code and final code for each section; Lots of small challenges are included in the videos so you can track your progress. And now, I hope to welcome you as a new student in my course! So click that "Enroll" button right now, and join me in this adventure today! But if you're not 100% sure yet, just go ahead and watch the promo video to take a look at the course project. I promise you will be amazed :) Read the full article
0 notes
Link
0 notes
Text
What is the MEAN stack? JavaScript web applications
The MEAN stack is a software stack—that is, a set of the technology layers that make up a modern application—that’s built entirely in JavaScript. MEAN represents the arrival of JavaScript as a “full-stack development” language, running everything in an application from front end to back end. Each of the initials in MEAN stands for a component in the stack:
MongoDB: A database server that is queried using JSON (JavaScript Object Notation) and that stores data structures in a binary JSON format
Express: A server-side JavaScript framework
Angular: A client-side JavaScript framework
Node.js: A JavaScript runtime
A big part of MEAN’s appeal is the consistency that comes from the fact that it’s JavaScript through and through. Life is simpler for developers because every component of the application—from the objects in the database to the client-side code—is written in the same language.
This consistency stands in contrast to the hodgepodge of LAMP, the longtime staple of web application developers. Like MEAN, LAMP is an acronym for the components used in the stack—Linux, the Apache HTTP Server, MySQL, and either PHP, Perl, or Python. Each piece of the stack has little in common with any other piece.
This isn’t to say the LAMP stack is inferior. It’s still widely used, and each element in the stack still benefits from an active development community. But the conceptual consistency that MEAN provides is a boon. If you use the same language, and many of the same language concepts, at all levels of the stack, it becomes easier for a developer to master the whole stack at once.
Most MEAN stacks feature all four of the components—the database, the front end, the back end, and the execution engine. This doesn’t mean the stack consists of only these elements, but they form the core.
MongoDB
Like other NoSQL database systems, MongoDB uses a schema-less design. Data is stored and retrieved as JSON-formatted documents, which can have any number of nested fields. This flexibility makes MongoDB well-suited to rapid application development when dealing with fast-changing requirements.
Using MongoDB comes with a number of caveats. For one, MongoDB has a reputation for being insecure by default. If you deploy it in a production environment, you must take steps to secure it. And for developers coming from relational databases, or even other NoSQL systems, you’ll need to spend some time getting to know MongoDB and how it works. InfoWorld’s Martin Heller dove deep into MongoDB 4 in InfoWorld’s review, where he talks about MongoDB internals, queries, and drawbacks.
As with any other database solution, you’ll need middleware of some kind to communicate between MongoDB and the JavaScript components. One common choice for the MEAN stack is Mongoose. Mongoose not only provides connectivity, but object modeling, app-side validation, and a number of other functions that you don’t want to be bothered with reinventing for each new project.
Express.js
Express is arguably the most widely used web application framework for Node.js. Express provides only a small set of essential features—it’s essentially a minimal, programmable web server—but can be extended via plug-ins. This no-frills design helps keep Express lightweight and performant.
Nothing says a MEAN app has to be served directly to users via Express, although that’s certainly a common scenario. An alternative architecture is to deploy another web server, like Nginx or Apache, in front of Express as a reverse proxy. This allows for functions like load balancing to be offloaded to a separate resource.
Because Express is deliberately minimal, it doesn’t have much conceptual overhead associated with it. The tutorials at Expressjs.com can take you from a quick overview of the basics to connecting databases and beyond.
Angular
Angular (formerly AngularJS) is used to build the front end for a MEAN application. Angular uses the browser’s JavaScript to format server-provided data in HTML templates, so that much of the work of rendering a web page can be offloaded to the client. Many single-page web apps are built using Angular on the front end.
One important caveat: Developers work with Angular by writing in TypeScript, a JavaScript-like typed language that compiles to JavaScript. For some people this is a violation of one of the cardinal concepts of the MEAN stack—that JavaScript is used everywhere and exclusively. However, TypeScript is a close cousin to JavaScript, so the transition between the two isn’t as jarring as it might be with other languages.
For a deep dive into Angular, InfoWorld’s Martin Heller has you covered. In his Angular tutorial he’ll walk you through the creation of a modern, Angular web app.
Node.js
Last, but hardly least, there’s Node.js—the JavaScript runtime that powers the server side of the MEAN web application. Node is based on Google’s V8 JavaScript engine, the same JavaScript engine that runs in the Chrome web browser. Node is cross-platform, runs on both servers and clients, and has certain performance advantages over traditional web servers such as Apache.
Node.js takes a different approach to serving web requests than traditional web servers. In the traditional approach, the server spawns a new thread of execution or even forks a new process to handle the request. Spawning threads is more efficient than forking processes, but both involve a good deal of overhead. A large number of threads can cause a heavily loaded system to spend precious cycles on thread scheduling and context switching, adding latency and imposing limits on scalability and throughput.
Node.js is far more efficient. Node runs a single-threaded event loop registered with the system to handle connections, and each new connection causes a JavaScript callback function to fire. The callback function can handle requests with non-blocking I/O calls and, if necessary, can spawn threads from a pool to execute blocking or CPU-intensive operations and to load-balance across CPU cores.
Node.js requires less memory to handle more connections than most competitive architectures that scale with threads—including Apache HTTP Server, ASP.NET, Ruby on Rails, and Java application servers. Thus, Node has become an extremely popular choice for building web servers, REST APIs, and real-time applications like chat apps and games. If there is one component that defines the MEAN stack, it’s Node.js.
Advantages and benefits of the MEAN stack
These four components working in tandem aren’t the solution to every problem, but they’ve definitely found a niche in contemporary development. IBM breaks down the areas where the MEAN stack fits the bill. Because it’s scalable and can handle a large number of users simultaneously, the MEAN stack is a particularly good choice for cloud-native apps. The Angular front end is also a great choice for single-page applications. Examples include:
Expense-tracking apps
News aggregation sites
Mapping and location apps
MEAN vs. MERN
The acronym “MERN” is sometimes used to describe MEAN stacks that use React.js in place of Angular. React is a framework, not a full-fledged library like Angular, and there are pluses and minuses to swapping React into a JavaScript-based stack. In brief, React is easier to learn, and most developers can write and test React code faster than they can write and test a full-fledged Angular app. React also produces better mobile front ends. On the other hand, Angular code is more stable, cleaner, and performant. In general, Angular is the choice for enterprise-class development.
But the very fact that this choice is available to you demonstrates that MEAN isn’t a limited straitjacket for developers. Not only can you swap in different components for one of the canonical four layers; you can add complementary components as well. For example, caching systems like Redis or Memcached could be used within Express to speed up responses to requests.
MEAN stack developers
Having the skills to be a MEAN stack developer basically entails becoming a full-stack developer, with a focus on the particular set of JavaScript tools we’ve discussed here. However, the MEAN stack’s popularity means that many job ads will be aimed at full-stack devs with MEAN-specific skills. Guru99 breaks down the prerequisites for snagging one of these jobs. Beyond familiarity with the basic MEAN stack components, a MEAN stack developer should have a good understanding of:
Front-end and back-end processes
HTML and CSS
Programming templates and architecture design guidelines
Web development, continuous integration, and cloud technologies
Database architecture
The software development lifecycle (SDLC) and what it’s like developing in an agile environment[Source]-https://www.infoworld.com/article/3319786/what-is-the-mean-stack-javascript-web-applications.html
62 Hours Mean Stack Training includes MongoDB, JavaScript, A62 angularJS Training, MongoDB, Node JS and live Project Development. Demo Mean Stack Training available.
0 notes
Link
Master Node by building a real-world RESTful API and web app (with authentication, Node.js security, payments & more)
What you’ll learn
Master the entire modern back-end stack: Node, Express, MongoDB and Mongoose (MongoDB JS driver)
Build a complete, beautiful & real-world application from start to finish (API and server-side rendered website)
Build a fast, scalable, feature-rich RESTful API (includes filters, sorts, pagination, and much more)
Learn how Node really works behind the scenes: event loop, blocking vs non-blocking code, streams, modules, etc.
CRUD operations with MongoDB and Mongoose
Deep dive into mongoose (including all advanced features)
How to work with data in NoSQL databases (including geospatial data)
Advanced authentication and authorization (including password reset)
Security: encryption, sanitization, rate limiting, etc.
Server-side website rendering with Pug templates
Credit card payments with Stripe
Sending emails & uploading files
Deploy the final application to production (including a Git crash-course)
Downloadable videos, code and design assets for projects
Requirements
Absolutely NO understanding of Node or back-end development is required! I take you from beginner to advanced developer!
Basic understanding of JavaScript is required (the course contains a section about asynchronous JavaScript with promises and async/await in case you need to get up to speed)
Basic understanding of HTML is a plus (only for final part of the course), but NOT a must
Any computer and OS will work — Windows, macOS or Linux
Description
Do you want to build fast and powerful back-end applications with JavaScript? Would you like to become a more complete and in-demand developer?
Then Node.js is the hot technology for you to learn right now, and you came to the right place to do it!
Welcome to the Complete Node.js, Express and MongoDB Bootcamp, your fast track to modern back-end development.
This course is the perfect all-in-one package that will take you from a complete beginner to an advanced, highly-skilled Node.js developer.
Like all my other courses, this one is completely project based! And not just any project: it’s a complete, beautiful and feature-rich application, containing both a RESTful API and a server-side rendered website. It’s the most fantastic and complete project that you will find in any Node.js course on the internet!
By building this huge project, you will learn all the skills that you need in order to plan, build and deploy your own modern back-end applications with Node.js and related technologies.
(Actually, if you feel like exploring the project, you can do so at www.natours.dev. And this is only a small part of the project! Log in with “[email protected]” and password “test1234”)
After finishing this course, you will:
1) Be building you own fast, scalable and powerful Node.js RESTful APIs or web applications;
2) Truly understand how Node.js works behind the scenes;
3) Be able to work with NoSQL data and model data in real-world situations (a hugely important skill);
4) Know how modern back-end development works, and how all the different technologies fit together (hard to understand from scattered tutorials and videos);
5) Have experience in professionally-used tools and libraries like Express, Mongoose, Stripe, Sendgrid, Atlas, Compass, Git, Heroku, and many more;
6) Have built a complete application, which is a perfect starting point for your own applications in the future.
Please note that this course is NOT for absolute web development beginners, so you should already be familiar with basic JavaScript. NO back-end experience required though!
It’s an absolutely full-packed, deep-dive course with over 40 hours of content!
Since this is the “Complete Node.js Bootcamp”, the course is crammed with tons of different technologies, techniques, and tools, so that you walk away from the course as a complete Node.js developer.
That’s why the course turned out to be over 40 hours long. But if that sound like too much for you, don’t worry, there are videos or entire sections that you can safely skip.
Here is exactly what you’re gonna learn:
Fundamentals of Node.js, core modules and NPM (Node Package Manager)
How Node.js works behind the scenes: event loop, blocking vs non-blocking code, event-driven architecture, streams, modules, etc.
Fundamentals of Express (Node.js framework): routing, middleware, sending responses, etc.
RESTful API design and development with advanced features: filtering, sorting, aliasing, pagination
Server-side website rendering (HTML) with Pug templates
CRUD operations with MongoDB database locally and on the Atlas platform (in the cloud)
Advanced MongoDB: geospatial queries, aggregation pipeline, and operators
Fundamentals of Mongoose (MongoDB JS driver): Data models, CRUD operations, data validation, and middleware
Advanced Mongoose features: modeling geospatial data, populates, virtual populates, indexes, etc.
Using the MVC (Model-View-Controller) architecture
How to work with data in NoSQL databases
Advanced data modelling: relationships between data, embedding, referencing, and more
Complete modern authentication with JWT: user sign up, log in, password reset, secure cookies, etc.
Authorization (user roles)
Security: best practices, encryption, sanitization, rate limiting, etc.
Accepting credit card payments with Stripe: Complete integration on the back-end and front-end
Uploading files and image processing
Sending emails with Mailtrap and Sendgrid
Advanced error handling workflows
Deploying Node.js application to production with Heroku
Git and GitHub crash course
And so much more!
Why should you learn Node.js and take this course?
If you want to learn Node.js and modern back-end development, then there is no doubt that this course is for you!
It’s the biggest Node.js course on the internet, it has by far the most complete course project, and offers the most in-depth explanations of all topics included.
And even if you already know some Node.js, you should still take this course, because it contains subjects that are not covered anywhere else, or not in the same depth!
But maybe you’re not yet convinced that Node.js really is the right technology for you to learn right now?
Well, first, Node.js will allow you to use your JavaScript skills to build applications on the back-end. That itself is a huge gain, which makes your full-stack development process so much easier and faster.
Plus, popularity and opportunities for Node.js are off the charts. It’s a modern, proven and reliable technology, used by tech giants (and 6-figure-salary-paying-companies) like Netflix, PayPal, Uber, and many more.
Node.js really is what you should invest your time in, instead of outdated technology like PHP.
In summary, if you already know JavaScript, learning Node is the logical next step for you! It will make you a better, more versatile and complete developer, which will ultimately boost your opportunities in the job market!
And I created this course to help you do exactly that! It really is the course I wish I had when I was first learning back-end development with Node.js and all related technologies.
And this is what you get by signing up today:
Lifetime access to 40+ hours of HD quality videos. No monthly subscription. Learn at your own pace, whenever you want;
All videos are downloadable. Learn wherever you want, even without an internet connection!
Friendly and fast support in the course Q&A whenever you have questions or get stuck;
English closed captions (not the auto-generated ones provided by Udemy);
Course slides in PDF format;
Downloadable assets, starter code and final code for each section;
Lots of small challenges are included in the videos so you can track your progress.
And now, I hope to welcome you as a new student in my course! So click that “Enroll” button right now, and join me in this adventure today!
But if you’re not 100% sure yet, just go ahead and watch the promo video to take a look at the course project. I promise you will be amazed 🙂
See you in the course!
Who this course is for:
Take this course if you want to build amazingly fast and scalable back-end applications using the JavaScript skills you already have. Node is the perfect tool for you!
Take this course if you’re a front-end developer looking to go into back-end development using the most complete course on the market.
Take this course if you have taken other Node courses but: 1) still don’t feel confident to code real-world apps, or 2) still feel like you need more back-end skills. This course is perfect for you!
Take this course if you’re an experienced Node developer who wants to add new skills missing in other courses: How Node works behind the scenes, advanced data modelling, geospatial data, complete and secure authentication, stripe payments, and more.
Created by Jonas Schmedtmann Last updated 6/2019 English English
Size: 19.70 GB
Download Now
https://ift.tt/30iLtmF.
The post Node.js, Express, MongoDB & More: The Complete Bootcamp 2019 appeared first on Free Course Lab.
0 notes
Text
What is the MEAN stack? JavaScript web applications
Most anyone who has developed web applications knows the acronym LAMP, which is used to describe web stacks made with Linux, Apache (web server), MySQL (database server), and PHP, Perl, or Python (programming language).
Another web-stack acronym has come to prominence in the last few years: MEAN—signifying a stack that uses MongoDB (database server), Express (server-side JavaScript framework), Angular (client-side JavaScript framework), and Node.js (JavaScript runtime).
[ Getting to know Node? Don’t miss: Node.js tutorial: Get started with Node.js • 10 JavaScript concepts every Node developer must master. • The complete guide to Node.js frameworks • 7 keys to structuring your Node app. | Keep up with hot topics in programming with InfoWorld’s App Dev Report newsletter. ]
MEAN is one manifestation of the rise of JavaScript as a “full-stack development” language. Node.js provides a JavaScript runtime on the server; Angular and Express are JavaScript frameworks used to build web clients and Node.js applications, respectively; and MongoDB’s data structures are stored in a binary JSON (JavaScript Object Notation) format, while its queries are expressed in JSON.
In short, the MEAN stack is JavaScript from top to bottom, or back to front. A big part of MEAN’s appeal is this consistency. Life is simpler for developers because every component of the application—from the objects in the database to the client-side code—is written in the same language.
This consistency stands in contrast to the hodgepodge of LAMP, the longtime staple of web application developers. Like MEAN, LAMP is an acronym for the components used in the stack—Linux, the Apache HTTP server, MySQL, and either PHP, Perl, or Python. Each piece of the stack has little in common with any other piece.
This isn’t to say the LAMP stack is inferior. It’s still widely used, and each element in the stack still benefits from an active development community. But the conceptual consistency that MEAN provides is a boon. If you use the same language, and many of the same language concepts, at all levels of the stack, it becomes easier for a developer to master the whole stack at once.
Most MEAN stacks feature all four of the components—the database, the front-end, the back-end, and the execution engine. This doesn’t mean the stack consists of only these elements, but they form the core.
[ JavaScript is the most widely deployed language in the world. Whether you’re a beginning, intermediate, or advanced JavaScript developer, you’ll master new skills with this nine-part course from PluralSight. ]
TABLE OF CONTENTS
MongoDB
Express.js
Angular
Node.js
MEAN stack companions
MongoDB
Like other NoSQL database systems, MongoDB uses a schema-less design. Data is stored and retrieved as JSON-formatted documents, which can have any number of nested fields. This flexibility makes MongoDB well-suited to rapid application development when dealing with fast-changing requirements.
Using MongoDB comes with a number of caveats. For one, it has a reputation for being insecure by default. If you deploy it in a production environment, you must take steps to secure it. And for developers coming from relational databases, or even other NoSQL systems, you’ll need to spend some time getting to know MongoDB and how it works. InfoWorld’s Martin Heller dove deep into MongoDB 4 in InfoWorld’s review, where he talks about MongoDB internals, queries, and drawbacks.
As with any other database solution, you’ll need middleware of some kind to communicate between MongoDB and the JavaScript components. One common way to do that in a MEAN stack is with Mongoose. Mongoose not only provides connectivity, but object modeling, app-side validation, and a number of other functions that you don’t want to be bothered with reinventing for each new project.
Express.js
Express is arguably the most widely used web application framework for Node.js. Express provides only a small set of essential features—it’s essentially a minimal, programmable web server—but can be extended by way of plug-ins. This no-frills design helps keep Express lightweight and performant.
Nothing says a MEAN app has to be served directly to users via Express, although that’s certainly a common scenario. An alternative architecture is to deploy another web server, like Nginx or Apache, in front of Express as a reverse proxy. This allows for functions like load balancing to be offloaded to a separate resource.
Because Express is deliberately minimal, it doesn’t have much conceptual overhead associated with it. The tutorials at Expressjs.com can take you from a quick overview of the basics to connecting databases and beyond.
Angular
Angular (formerly AngularJS) is used to build the front end for a MEAN application. Angular uses the browser’s JavaScript to format server-provided data in HTML templates, so that much of the work of rendering a webpage can be offloaded to the client. Many single-page web apps are built using Angular on the front end.
One important caveat: Developers work with Angular by writing in TypeScript, a JavaScript-like typed language that compiles to JavaScript. For some people this is a violation of one of the cardinal concepts of the MEAN stack—that JavaScript is used everywhere and exclusively. However, TypeScript is a close cousin to JavaScript, so the transition between the two isn’t as jarring as it might be with other languages.
For a deep dive into Angular, InfoWorld’s Martin Heller has you covered. In his Angular tutorial he’ll walk you through the creation of a modern, Angular web app.
Node.js
Last, but hardly least, there’s Node.js—the JavaScript runtime that powers the server side of the MEAN web application. Node is based on Google’s V8 JavaScript engine, the same JavaScript engine that runs in the Chrome web browser. Node is cross-platform, runs on both servers and clients, and has certain performance advantages over traditional web servers such as Apache.
Node.js takes a different approach to serving web requests from traditional web servers. In the traditional approach, the server spawns a new thread of execution or even forks a new process to handle the request. Spawning threads is more efficient than forking processes, but both involve a good deal of overhead. A large number of threads can cause a heavily loaded system to spend precious cycles on thread scheduling and context switching, adding latency and imposing limits on scalability and throughput.
Node.js is far more efficient. Node runs a single-threaded event loop registered with the system to handle connections, and each new connection causes a JavaScript callback function to fire. The callback function can handle requests with non-blocking I/O calls, and if necessary can spawn threads from a pool to execute blocking or CPU-intensive operations and to load-balance across CPU cores.
Node’s approach requires less memory to handle more connections than most competitive architectures that scale with threads—including Apache, ASP.Net, Ruby on Rails, and Java application servers. Thus Node has become an extremely popular choice for building web servers, REST APIs, and real-time applications like chat apps and games. If there is one component that defines the MEAN stack, it’s Node.js.
For an introduction to Node, see Martin Heller’s explainer. To get started developing with Node, see his Node.js tutorial.
MEAN stack companions
There’s nothing that says a MEAN stack must consist of only MongoDB, Express, Angular, and Node.js. The MEAN stack can include other pieces that complement or extend these four components.
For example, caching systems like Redis or Memcached could be used within Express to speed up responses to requests. Or the React framework could be used as an alternative or a complement to Angular. The acronym “MERN” is sometimes used to describe MEAN stacks that use React in place of Angular.[Source]-https://www.infoworld.com/article/3319786/what-is-the-mean-stack-javascript-web-applications.html
62 Hours
Mean Stack Training
includes MongoDB, JavaScript, A62 angularJS Training, MongoDB, Node JS and live Project Development. Demo Mean Stack Training available.
0 notes
Text
October 31, 2019 at 10:00PM - The Full Stack JavaScript Bundle (94% discount) Ashraf
The Full Stack JavaScript Bundle (94% discount) Hurry Offer Only Last For HoursSometime. Don't ever forget to share this post on Your Social media to be the first to tell your firends. This is not a fake stuff its real.
This massive course is one of the most complete and comprehensive you’ll find on web development. Regardless of your skill level, you can dive headlong into building robust, interactive sites that will put you on the map as a skilled web developer. Covering both front- and back-end development, this course aims to give you a holistic understanding of the development process.
Access 197 lectures & 25.5 hours of content 24/7
Learn front-end development w/ JavaScript, jQuery, HTML5, CSS3, & Bootstrap
Explore back-end development w/ PHP, MySQL, & MySQLi
Get a complete look at how the internet actually works
This course provides you with a practical approach to the MEAN Stack, a collection of JavaScript based technologies used to develop web applications. An acronym for MongoDB, ExpressJS, AngularJS, and Node.js, the MEAN Stack is a complete set of tools that can help you build incredible sites from the ground up. In this course, you’ll start from absolute basics as you hone your skills to eventually be able to create an entire site.
Access 61 lectures & 4.5 hours of content 24/7
Learn the fundamentals of JavaScript
Install MEAN Stack on different platforms like Windows, Linux, AWS, & EC2 Instance
Work w/ Express tools like Templates, Generator, Middleware, & more
Develop a course-based website & explore how to create models for MongoDB using Mongoose
Cover authentication using Express & Passport
Explore how to work w/ AngularJS & configure client side routing
Learn how to deploy your solution on production w/ Heroku deployment
Interested in Node.js, but don’t know where to start or how to learn it properly? Confused about how the MEAN stack pieces of MongoDB, Expressjs, Angularjs, and Nodejs fit together? Or how it’s even possible to run JavaScript outside of the browser? This course delivers the best information in the simplest way to help you learn about these systems. Save time and frustration by learning best practices for building and deploying apps.
Study Node.js w/ over 79 lectures & 9.5 hours of content
Start creating Node.js apps from scratch
Get an overview of JavaScript concepts & issues
Use MongoDB in your projects
Study the Express.js framework
Learn to deploy an app to Heroku & AWS
This hands-on course introduces you to JavaScript web and mobile development using the latest front- and back-end technologies including Node.js, MongoDB, Backbone.js, Parse, Heroku, and Windows Azure. You’ll learn by doing as you build multiple versions of the Chat app and get familiar with the full stack development process.
Access 15 lectures & 2 hours of content 24/7
Build multiple versions of the Chat app using jQuery + Parse JS REST API, Backbone & Parse JS SDK, & more
Explore various examples of fetching data, displaying it, & submitting new data
Spend less time learning & more time building apps thanks to practical examples
MongoDB is one of the hottest database solutions in the tech world right now, able to power anything from a growing personal project to an enterprise infrastructure. This course will get you up and running with MongoDB quickly, and tech you the core knowledge you need to deeply understand and builds apps centered around Mongo. Whether you’re new or have been working to learn it but aren’t quite there yet, this course is for you.
Access 128 lectures & 13.5 hours of content 24/7
Learn how to use the popular MongooseJS library to interface w/ Mongo
Write tests around Mongo queries to ensure your code is working
Master the process of designing NoSQL schema
Grasp the differences record associations & resource embedding
Use the advanced features of Mongoose to save development time
Develop apps that are fast & response thanks to Mongo’s speed & flexibility
Upgrade your skills and become a more efficient developer by incorporating Angular.js, Google’s supported web application library, into your projects. In this course, you’ll learn how to use Angular.js from scratch so that you can create more user-friendly web apps, Single Page Applications (SPA), and interactive websites.
Access 30 lectures & 1.5 hours of content 24/7
Learn how to use Angular.js to save time, create better projects, & give your users a better experience
Create a full SPA from scratch
Cloud-enable your SPA so that you can connect it to any kind of back-end
Architecture a SPA w/ modules, controllers, & services
Add URL routes to your client-side SPA
Access live examples at the end of each coding lesson
Being a one-trick programming pony doesn’t cut it anymore in today’s tech job market. When it comes to web app development, having the know-how to create something fully-functioning from start to finish boosts your employability credentials in a big way. MEAN Stack is the tool set that allows you to do just that, and this course is designed to get you up to speed.
Access 186 lectures & 10 hours of content 24/7
Understand MEAN Stack & how to use it effectively
Code MEAN projects w/ an online IDE
Develop MEAN REST APIs w/ Node & Express
Create top-notch UIs w/ Angular 2
Gain the skills needed to become a sought after web developer
Express is an extremely powerful tool for creating web applications built on Node. Over this action-packed series of tutorials you’ll learn how to use and implement the Express library. Express is extremely practical, whether you’re looking to use it for prototyping, hobbies, or to improve your qualifications, and this course will help you do it all.
Access 14 lectures & 1.5 hours of content 24/7
Install Express on your computer, run a custom server, & understand requests & responses
Use GET & POST requests
Write & run tests w/ Mocha & learn about RESTful APIs
Test your knowledge w/ quizzes
from Active Sales – SharewareOnSale https://ift.tt/2rOmTfs https://ift.tt/eA8V8J via Blogger https://ift.tt/2NyjESm #blogger #bloggingtips #bloggerlife #bloggersgetsocial #ontheblog #writersofinstagram #writingprompt #instapoetry #writerscommunity #writersofig #writersblock #writerlife #writtenword #instawriters #spilledink #wordgasm #creativewriting #poetsofinstagram #blackoutpoetry #poetsofig
0 notes
Text
Node Js Training in Hyderabad
Node Js is an advanced Java script Framework mainly used in the Development of Web Applications, and Software Applications. Node Js is an open source server-side Java script framework, which has a numerous library features, serves as the unique java script framework. NBITS offers Node Js Training in Hyderabad, the course is designed for every individual where the enrolled candidate can easily understand the Angular & Node concepts and acquire strong knowledge on Advanced Node Js.
Objectives of the Course:
Node Js Online Training from NBITS will give strong knowledge on server scripting of Node Js and cover all the core and advanced concepts of Node Js. Main Objectives of the course are:
Ø Strong knowledge on Node Js concepts like Objects, Handling Ajax Request,
Ø Understanding the process of creation of the first Node Js app, Understanding NPM in Node Js.
Ø Strong understanding of Dependencies with the package JSON.
Ø Understanding the concepts of Node Js like Connecting to Mongoose, Search Operations, Working with MongoDB, CRUD Operations.
Ø Creation of a simple HTTP server and strong understanding and installing Express JS in Node Js framework.
Ø Strong knowledge on Building an app with Node Js and Express Js with MVC architecture.
Ø Real-time Project knowledge on Node Js.
Prerequsites of the Course:
To Learn Node Js Course in Hyderabad, one needs to have good programming knowledge on any language. Having Back end knowledge and Database knowledge will be added advantage, but not mandatory.
Intended Audience:
Any Programming aspirant and IT Professional can opt for Node Js Course in Hyderabad from NBITS, It mainly suits job aspirants with a strong programming background. It also suits:
Ø Freshers.
Ø System Admins.
Ø Developers.
Ø Programmers.
Ø Testers.
Ø Working IT professionals.
Enroll Now and learn the server-side Java script Framework - Node Js Course in Hyderabad from NBITS and get job ready in Software Sector.
0 notes
Text
Best Node JS Online Training
Node Js is a server-side programming language where it helps in the development of desktop and mobile applications. Node Js is widely used in large-scale organizations and startups as well. Node.js runs on various platforms like Windows, Linux, Unix, Mac OS X, etc. Learning Node Js will benefit Front-end Developers and Backend Developers. NBITS's Node Js Training in Hyderabad, that is intended for all the aspirants.

Objectives of the Course:
NBITS's Node Js Online Training will offer real-time training to all the enrolled candidate, Main objectives of the course:
Ø Basics of Node Js - Objects, Handling Ajax Request, Creation of first Node JS app, Understanding NPM in Node JS.
Ø Understanding dependencies with the package JSON and Creation of simple HTTP server and Understanding and installing Express JS
Ø Acquires strong knowledge on Node Js concepts like Connecting to Mongoose, Search Operations, Working with MongoDB, CRUD Operations.
Ø Leverages knowledge on Building an app with Node and Express with MVC architecture.
Ø Real-time Project knowledge on Node Js.
Prerequisites of the Course:
Good to have knowledge of strong programming on Angular Js, but not mandatory. It will be added advantage to have knowledge on MVC.
Intended Audience:
Any IT Professional can opt for Node Js Course in Hyderabad from NBITS, It mainly suits graduates with a programming background. It also suits:
Ø Freshers
Ø System Admins
Ø Developers
Ø Programmers.
Ø Testers
Ø Working IT professionals.
Enroll Now and learn the server-side Javascript Framework - Node Js Course in Hyderabad from NBITS and get job ready in Software Sector.
0 notes
Text
Best Node JS training in Noida
An open source which works as event-driven architecture that allows for developing server-side and networking applications is known as Node JS. It provides a collection of libraries which have various JavaScript modules. Node JS simplifies the development of web applications also provides better performance. It can able to handle many asynchronous connections with very minimal overhead in a single process. Node JS enables JavaScript to be used for server-side scripting and it runs on server-side to produce dynamic web page content. Due to these qualities, it becomes a popular choice among developers to build the powerful web application. KVCH is offering their high-quality Node JS industrial training to the candidates in Noida. We provide full courses in Node JS from the basic beginner’s to advanced professional level. We are clarified as the best training center for Node JS in Noida. This will help candidates to know about this cool technology including the use of Events, Stream and Modules and advanced web technology in applications. The candidates who are from BE, B Tech, ME, M Tech, BCA, MCA, Bsc. IT, MSC. IT, MBA IT, Diploma in IT, OR Interns, Fresher, Working professional can take Node JS training from KVCH Noida.
In our training, candidates will implement the concepts of Node JS, Npm, Asynchronous programming, ES6/ES7, MongoDB, Express, Socket.IO, JWT Authentication, Mongoose, Application deployment with Heroku on real-time projects. This training program is ideal for every frontend developer who is looking to learn server-side development and want to create scalable and responsive web applications with it. Candidates will learn the how to import additional modules and configure the project using Npm. All of our Node JS training experts are from industry with more than 10 years of experience in real-time live project based on Node JS. We also deliver our best live project based Node Js training in Noida to explore the candidate’s limited skills. We make them confident and prepare to handle the industries real-time issues or pressure.
We have designed our training syllabus and modules in such a way that makes candidates learning Node JS easily and perfectly. Our trainers deliver candidates practical examples along with the technicalities of the software to guarantee a complete command over Node JS. The practical training is done in our high-tech labs equipped with modern gears which support candidates in sharpening their skills. We are also the best training center with 100% placement of candidates in big industries, enterprises, government ventures and MNCs.
For more queries/additional information, feel free to contact our helpline number +91 9510 860 860 or visit our website.
0 notes